Punchbot Drainalot
This build is a complete lvl 60 setup and is UP-TO-DATE with the new relic subclass rework. The subclass used is Blood Drinker. It’s a build that can dish out some nice damage when our energy is full via the combination of max lvl Drain + Dance of Death + Blood Seekers + Rapid Strike + Vortex Bomb. If we lead in by applying vulnerability with Sonic Pulse, the enemies will take additional 40% dmg. On top of this, we have added the +50% Physical dmg from the Bloody Chalice Relic passive skill. No more 50% physical dmg passive. Living Barrier is amazing with that +50% dmg reduction & +20% max HP heal per second, Blood Seekers & Drain also heal us pretty nicely. I’ve included Rapid Strike to help with the DPS when Drain is recharging energy + Vortex Bomb to help with venting. Ramming Robot is our escape and mobility skill. Skittering Shoulders (even without a set bonus) is a great source of survivability so it not a bad option but a blue will be better if you don’t need that dmg reduction AoE field.
September 17th EDIT: I’ve updated the skill points allocation screenshots to include the extra 10 points (total of 70) that the new update added.
Build Video footage:
The skills I use:
- Drain – major source of AoE dps for a cheap energy cost. At Tier 3 this costs only 12,5 energy (excluding any cost reduction from gear). Combined with an Egg of Mayhem this = UBER DPS 🙂
- Rapid Strike – our spammy source of damage + heat builder especially when we have no energy for Drain + the Tier 2 gives all our Brawl skills +20% dmg as well.
- Vortex Bomb – Is our vent skill + a good source of AoE damage + pulls/vacuums the enemies close to us + 20% melee combat dmg reduction for the Tier 2 bonus + the Tier 3 makes it spawn bombs for more AoE dmg. It also gets boosted by the Tier 2 Rapid Strike bonus.
- Ramming Robot – our escape mechanic and a movement skill. It also knocks back enemies we make contact with while using it. We also get 1 more charge on Tier 1. Tier 3 we get burning hot spots at the start and end of the skill.
- Sonic Pulse – applies Vulnerability to the enemies to make them take 40% more damage. The Tier 2 gives us +10% Relic Energy Charge Rate. It can also be auto-cast with 50% (or 100% with the set bonus) chance when wearing the Mountain King’s Hatch.
- Power Projection – gives us and nearby allies 50% increased defenses + the Tier 1 bonus heals for 15% max hp per use.
- Living Barrier – it’s amazing and gives +50% dmg reduction and +20% max HP heal per second. It lasts for 3 seconds by default. This one’s on a cooldown and does not cost Energy.
- Blood Seekers – It’s a great bit of Extra DPS to nearby enemies as well as a +25% dmg buff + heals us every second.
- Dance of Death – Our BIG relic skill that we can active after spending a total of 200 energy with other skills like Drain. It’s good to save and use this on champions & bosses.
The gear I recommend using is:
MY IDEAL EQUIPPED GEAR:
- A good rolled + socketed 2 handed blue weapon – with Flat DMG base + additional Flat DMG affix(es) + preferably +%dmg to Drain
(OR a version with 1 hand + shield/focus with Flat DMG rolls [on the wep and focus] + sockets on both. With extra Flat DMG or +%crit dmg on the weapon and with built-in defense on the shield [as the top affix].
- Must wear 3 Mountain King’s pieces! I suggest wearing:
Mountain King’s Cuirass + Helmet + Gauntlets:- Mountain King’s Cuirass – gives +1 Barrage Skills (+2 with the 3 piece set bonus) [I’ve tested it and it won’t give you extra levels if the skill is already lvl 10 so go for lvl 9 if you have +1 or 8 if you have +2 to those skills]
- Mountain King’s Helm – gives +1 Brawl Skills (+2 with the 3 piece set bonus) [I’ve tested it and it won’t give you extra levels if the skill is already lvl 10 so go for lvl 9 if you have +1 or 8 if you have +2 to those skills]
- Mountain King’s Gauntlets – Vent 75 or more Heat: gain Overheated, increasing Critical Chance by 10% for 10 seconds (becomes a +20% crit chance buff with the 3 set pieces bonus)
- The rest will preferably be good rolled + socketed Blue (rare) items (unless you want to wear Skittering Shoulders)
On all blue items, you’ll be looking for flat dmg, %dmg and/or Crit dmg & Crit Chance along with other good rolls. In the case of the Helmet, If you want to get 1 more skill point to work with, try getting one that gives + 1 Skill Level to any skill that you have spent more than 1 point into.
Blue Gear only gets 1 socket now.
Suggested Legendarium Powers (to fill in the gaps from items you’re wearing):
MY IDEAL LEGENDARIUM COMBO:
- Face Breaker – boost our Rapid Strike to also fire a piercing projectile that dfeals Rapid Strike‘s dmg
- Unstable War Arm – Cast Vortex Bomb: if above 75 Heat, trigger a secondary heat wave, dealing 400% Weapon Dmg (This was not mentioned in the video … sorry, totally brainfarted and forgot about it)
- Arc-Powered Treads – 10% chance to gain 25 energy when casting Drain (20% with the 3 set pieces bonus)
For the 3rd slot there are two other items you might want to consider:
- Option 1: Skittering Shoulders – (If not wearing them) spawns a +50% dmg reduction zone for 15 sec.
- Option 2: Raging Beater – Cast Ramming Robot: if above 75 Heat, vent all heat to deal 200% Weapon Damage when you start and stop moving.
The recommended stats to look for in your items are (the list is not in order of priority and is just listing good bonuses + there’s new stats and I might have missed some which will get added later):
- + Flat Damage
- +% elemental dmg – starts getting very good later on when you have a nice flat to boost with this.
- +% Damage to Brawl skills
- +% Damage to Drain/Dance of Death/Blood Seekers (and any of the other relic skills we use) – The Drain dmg bonus should be VERY high on your priority list!
- + Health
- + Defense (the non elemental is good for any act but lesser numbers than elemental)
- +% Critical Hit Chance
- +% Critical Damage (the cap is 300%)
- +% Gear Luck (eventually try to get like 50-75% total for good drop quantity – the cap is 100%)
- +% Energy Recharge Rate
- -% Relic Energy cost
- +% Relic Active Skill Damage
- +% Block Chance
- +% Chance to Evade damage
- +% Heat Dissipation
- +% Chance to Chill – a decent CC proc that works well with this build
- +% Chance to Poison is a decent DoT and stacks with other DoTs
- +% Chance to Bleed and/or Burn to stack the poison with the other DoTs. Bleed is very good for this build if using Rupture and it’s not bad to have it rolled in such case.
- + % Chance to Stun/Slow/Blind – not a bad choice but not high priority
The Skills and Passives I recommend are:
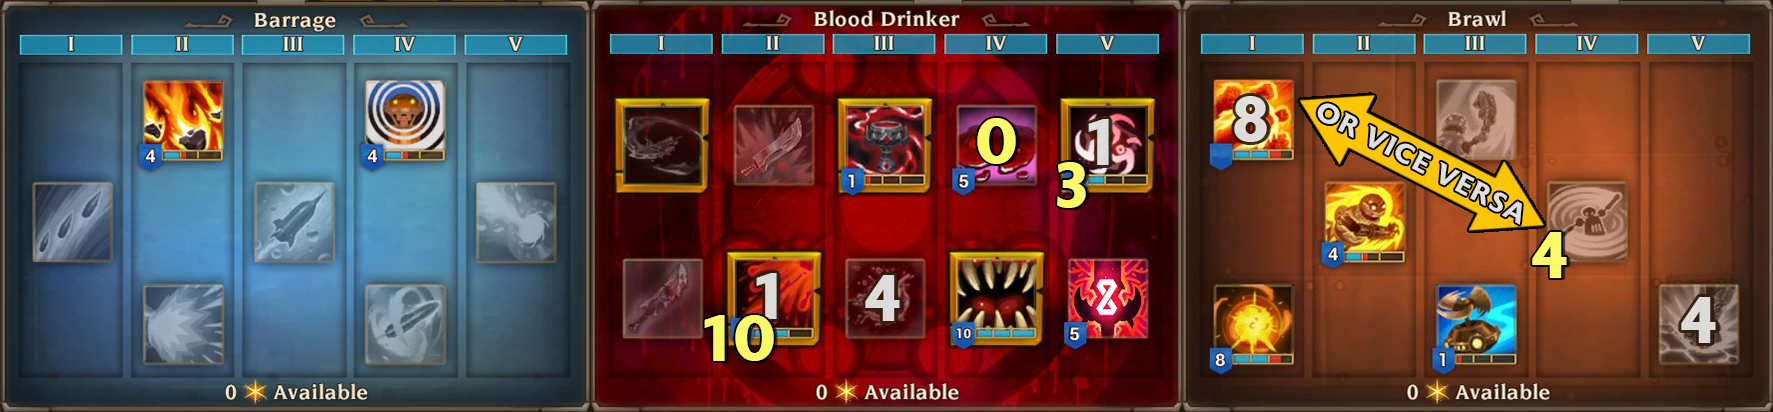
IMPORTANT: Keep in mind that my setup + all other alternative examples are WITH the +2 Barrage & +2 Brawl skill lvls form the Mountain King’s Helm & Cuirass. It does not include an extra +1 level to a random skill that we use! With a +1 extra skill level bonus (that can roll as an affix on the helmet), we could get that extra skill point to allow getting a passive from lvl 4 to lvl5 or an extra Tier 1 or Tier 2 bonus.
September 17th EDIT: I’ve updated the skill points allocation screenshots to include the extra 10 points (total of 70) that the new update added. The numbers in YELLOW represent the suggested skill levels after the new update. In some cases you may need to remove points from one skill to get another one leveled.
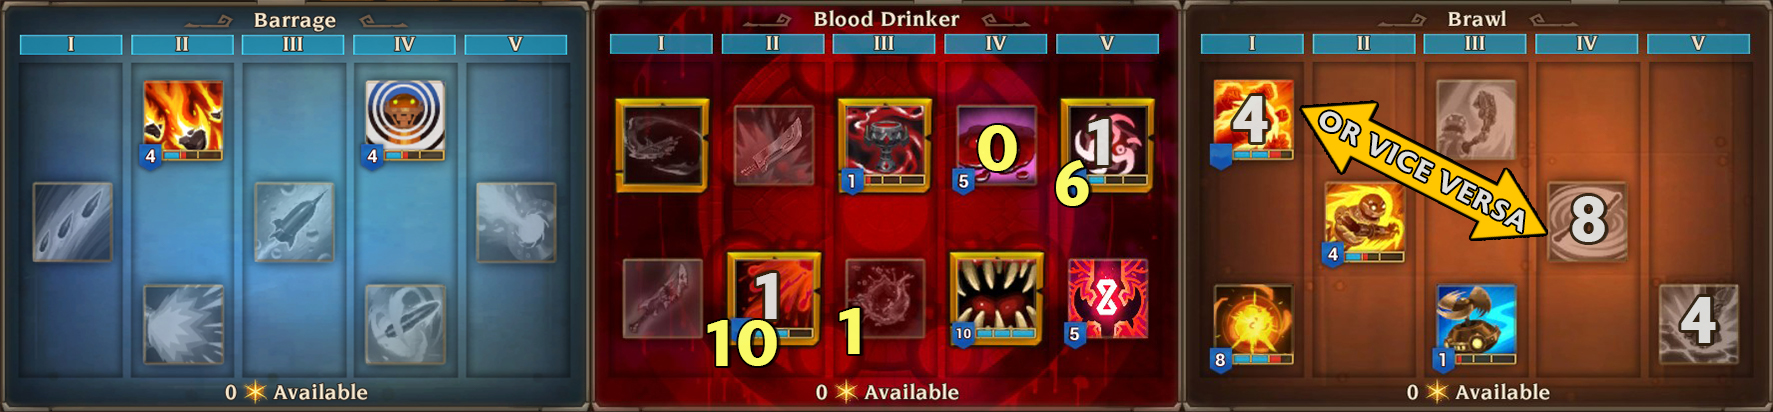
With the new points it’s easy to get each setup work as both ‘Spin 2 Win’ or ‘Bunches of Punches’. Just swap the lvl 8 Rapid Strike with the lvl 4 Cyclone Mode to get a ‘Spin 2 Win’ version or vice versa for a ‘Bunches of Punches’ version.
REGULAR VERSION (used in the video):

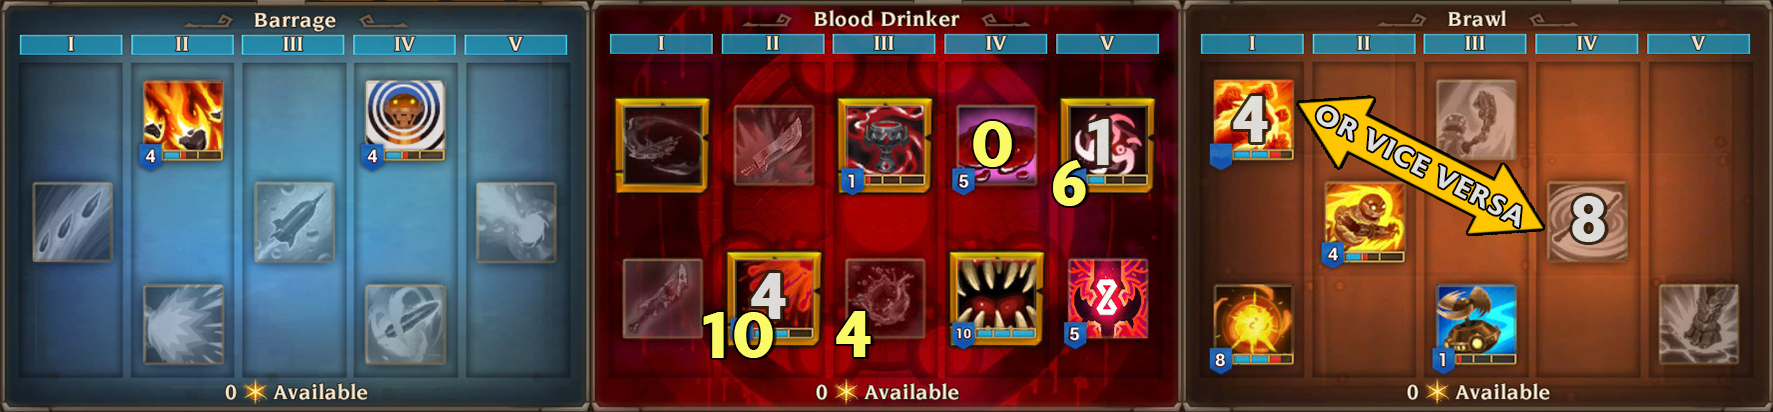
SPIN2WIN WITH -10% TO FORGED COOLDOWNS:
SPIN2WIN WITHOUT THE CDR:
PUNCHES WITH -10% TO FORGED COOLDOWNS:

PUNCHES, RUPTURE & -10% TO FORGED COOLDOWNS: