
Pirate ZAPtain
(Lightning Strikes, Explosive Kegs & Cannonballs galore, and more)
♦ ◊ ♦ ◊ ♦
This build is a complete lvl 60 setup and is UP-TO-DATE with the Spring Update from May 25th. The subclass used is Electrode. I believe the build can be amazing when geared & should be very close to the META builds in terms of DPS. Just like any build, in the right hands, this setup should be able to finish all Fazeer stages. It can dish out massive damage when we are playing it well. Good sources of damage of this build are the DPS buff of Localized Storm (+25% dmg) + the damage bonus from Dread Banner that gives us +25% dmg + the curse from Black Spot that makes cursed enemies take +40% dmg. When all buffs are in place we spam Plunderbuss or another Doubloon skill on trash mobs while using cooldown skills such as Powder Keg and Broadside on high HP targets for burst DPS. We can stack the My Lil’ General‘s 25% dmg with the dmg sources mentioned above. The idea of the build is use Imbue Relic (from the Ancient Ember Boots) as a “battery” that allows us to keep Localized Storm up all the time (as long as we’re in combat). The Frostwall Shield + either a North Mace OR a Glacier’s Edge (sword) lowers the cooldowns of item-granted skills such as Imbue Relic by 25% or 50% with the set bonus which further helps with keeping Localized Storm up. Add to this Wraith Walk for mobility and an escape mechanic and it’s a well rounded build.
Build Video footage:
The skills I use:
- Plunderbuss OR FIRE! OR Maelstrom – our spammy DPS skill + Doubloon consume. Plunderbuss seems the best for DPS from the 3 but if you like want pulls Maelstrom is amazing for CC where FIRE! is nice to let it do it’s own auto-dps. Consider using the legendary item for Plunderbuss (Fortune’s Spire).
- Powder Keg – Is amazing source of BURST DPS. Can either use quick 3 kegs or make pauses between the uses. It’s best to have 3 of those ready for big boss fights on the initial dmg burst wave.
- Broadside – Is a solid choice of additional dps on a cooldown that also recharges the cooldown by 1.5 sec. after using any other Piracy skill. This works amazingly well with builds that spam Plunderbuss (soon will make one such variant of this build with Plunderbuss as a focus).
- Dread Banner – we use it to stun enemies as well as to give us and our allies +25% dmg (as well as +25% attack speed, movement speed, & crit chance) but the dmg is what we care about here.
- Black Spot – we use it to apply a curse, making enemies take 40% more dmg and it also does some additional dps if the enemy dies or the curse ends.
- Wraith Walk – our escape mechanic and a movement skill. This also pulls nearby doubloons to us and help keep us at full without needing to run around and collect.
- Imbue Relic – fully re-fills our Relic energy. Granted by the Ancient Ember Boots. This helps us keep Localized Storm permanently up as long as we’re fighting due to getting the cooldown of this skill as low as 30 sec (when using Frostwall + North Mace).
- Localized Storm – It’s a good source of DPS buff (+25% dmg while it lasts) that also buffs nearby allies for the same amount. It also buff us and nearby allies with extra +10% movement speed too and does a very good periodic dmg to random nearby enemies
- You can fill the last skill bar slot based on what you like (basic attack, item granted skills, Take a Swing, Double Cross, etc.)
The gear I recommend using is:
MY IDEAL EQUIPPED GEAR:
- A good rolled + socketed 1 handed weapon from the Arctic Armaments set – Glacier’s Edge sword or the North Mace OR Blue weapon + a good rolled & socketed Frostwall Shield
- Must wear 3 Commodore Set pieces! I suggest wearing: Commodore Cape + Jacket + Pauldrons:
- Commodore‘s Cape – gives +1 Piracy Skills (+2 with the 3 piece set bonus) [I’ve tested it now gives you extra levels and DMG if the skill is already lvl 10 and you can use this to overcap skills]
- Commodore‘s Pauldrons (Shoulders) – When you pick up a Doubloon it grants a 10% dmg & gold luck buff for 10 seconds (20% with the 3 piece set bonus)
- Commodore‘s Jacket (Chest) – gives +1 Cursed Skills (+2 with the 3 piece set bonus) [I’ve tested it now gives you extra levels and DMG if the skill is already lvl 10 and you can use this to overcap skills]
- Ideally also wear Ancient Ember, Arc-Powered, or Winterweave pieces! I suggest those be: Ancient Ember Boots (or Woodsbeast Boots) + Winterweave Pants + Winterweave Gauntlets:
You’ll be looking for flat dmg, optionally % elemental dmg and/or Crit dmg/chance, +%Evasion +%Block Chance, +%Powder Keg OR +%Broadside DMG or +%DMG to your Doubloon Skill, + X lvl to any skill you use as active (I suggest to try and get +X lvls to Powder Keg) and have more than 1 point into, + others.
- the Shoulders and Chest rolled for +% Crit Dmg
- the Chest, Shoulders and Pants rolled for +%dmg to Powder Keg (or your skill of choice)
- the Pants + Chest will ideally also roll with + flat dmg
- the Boots can ideally be rolled for % Crit dmg and maybe elemental dmg
- Crit Chance rolls on the Cape and Pants is amazing too
Suggested Legendarium Powers (to fill in the gaps from items you’re wearing):
MY IDEAL LEGENDARIUM COMBO:
- My Li’ General (you could also wear this and slot the Frostwall here)
- Woodsbeast Sandals – for crit chance (while you wear Ancient Ember Boots) OR wear the Woodsbeast then slot Ancient Ember Boots here to get Imbue Relic.
- pick one of those 3:
- The Showman for and extra Keg to Powder Keg
- Big Fish for extra dps to Broadside
- Fortune’s Spire for extra row of projectiles to Plunderbuss
Ideally you wear Commodore‘s Jacket, Cape + Shoulders also Frostwall + North Mace OR Glacier’s Edge, alongside Ancient Ember Boots + Winterweave Gauntlets + any Pants.
Based on availability & your preference there are alternatives:
- Option 1: other Commodore, or Skittering, or Winterweave, or Ancient Ember, or Arc-Powered set pieces
- Option 2: The Many Tentacled One if using FIRE! OR maybe even Coral Cudgel when using Maelstrom
- Option 3: Or anything else you like
The non-class specific shoulders now give us an active skill to slot in the skillbar which not everyone may like.
The recommended stats to look for in your items are (the list is not in order of priority and is just listing good bonuses + there’s new stats and I might have missed some which will get added later):
- + Flat Damage (any)
- +% elemental dmg (any) – starts getting very good later on when you have a nice flat to boost with this if you match the flat with the %
- +% Damage with Powder Keg/Broadside/Plunderbuss
- +% Duration to Localized Storm (this is a pretty amazing bonus especially before you unlock/start using Imbue Relic)
- + Health
- + Defense (the non elemental is good for any act but lesser numbers than elemental)
- +% Critical Hit Chance (the cap is 40% and we can get this with just the pet aura + Woodsbeast Sandals)
- +% Critical Damage (the cap is 300%)
- +% Gear Luck (eventually try to get like 50-75% total for good drop quantity – the cap is 100%)
- +% Energy Recharge Rate is pretty good for this build
- -% Relic Energy cost is pretty good for this build
- +% Block Chance (capped at 40%)
- +% Chance to Evade damage (capped at 40%)
- +% Doubloon Generation
- +% Chance to Chill – a decent CC proc
- +% Chance to Freeze – a very good CC proc for any build and amazing for any build
- +% Chance to Poison is a decent DoT but not needed for this build
- +% Chance to Bleed and/or Burn are good DoTs but not needed.
- +% Chance to Shock – a decent proc and amazing for this build. Try to socket this on a shield/focus.
- +% Additional Bolts Fired on Shock – a decent proc booster and good for this build
- +% Chance to Stun/Slow/Blind – good but not a very important choice
The Skills and Passives I recommend are:
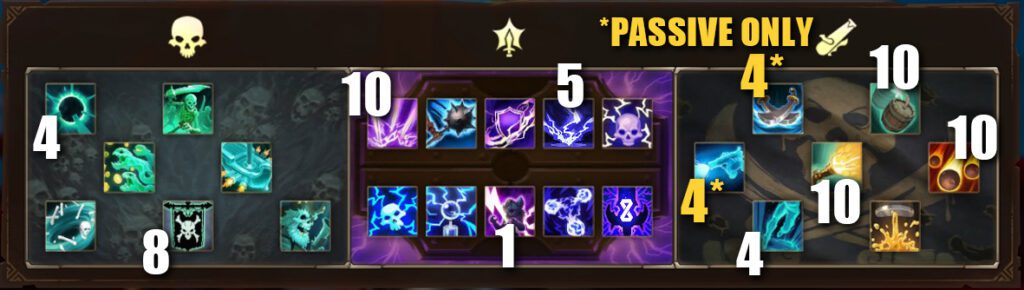
IMPORTANT: Keep in mind that my setup is WITH the +2 Piracy & +2 Curse Skills levels from the Commodore Set Cape + Jacket! On top of that I did NOT “use” the extra +1,+2,+3 Skill Point(s) from a cape.
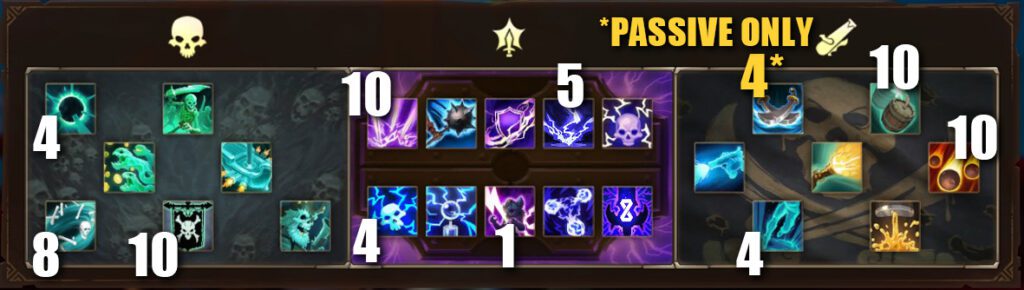
MY IDEAL/RECOMMENDED SETUP (used in the video LVL 10 PLUNDERBUSS & LVL 4 FIRE!):
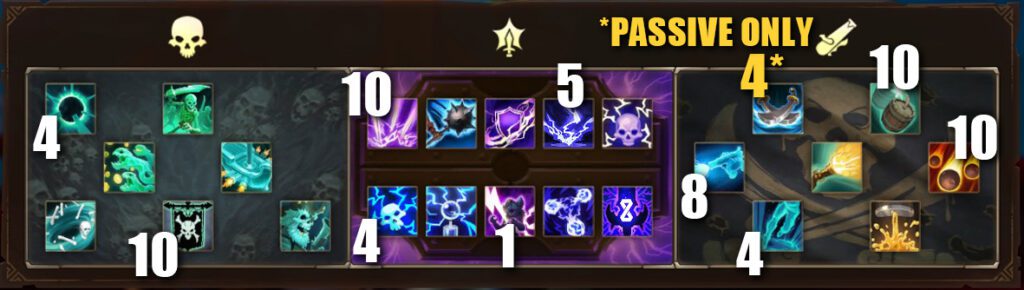
WITH LVL 10 PLUNDERBUSS & LVL 4 SHOCKING DISPLAY:
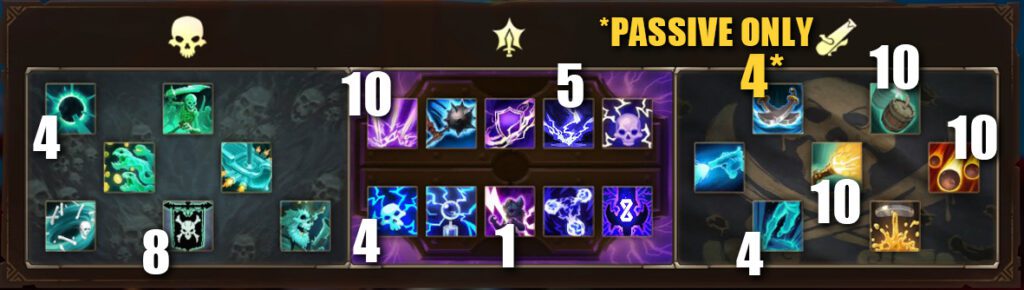
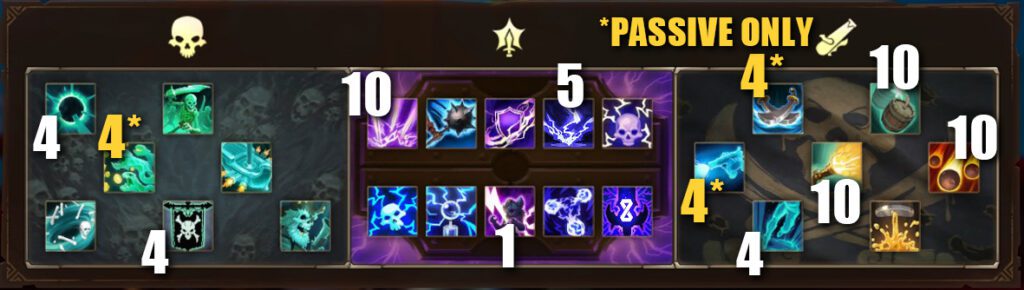
WITH LVL 8 PLUNDERBUSS & LVL 4 SHOCKING DISPLAY:
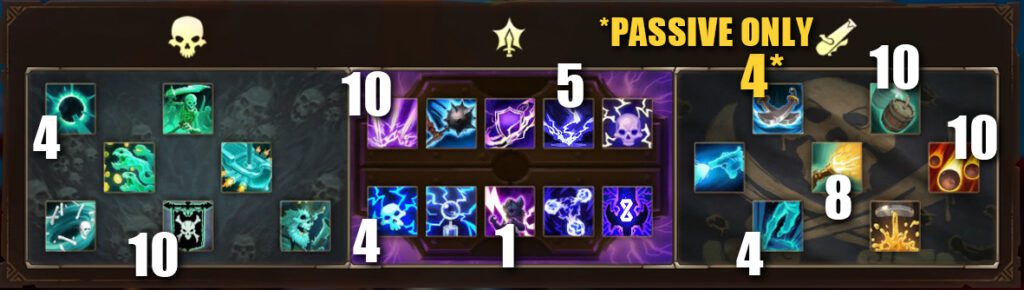
WITH LVL 8 MAELSTROM & LVL 4 SHOCKING DISPLAY:
WITH LVL 8 FIRE! & LVL 4 SHOCKING DISPLAY:
WITH LVL 10 PLUNDERBUSS & MAX DOUBLOONS GENERATION:
How to LVLUP the Build:
lvl 2 – get Localized Storm lvl 1
lvl 3 – get Localized Storm lvl 2
lvl 4 – Save a point then @ lvl 5 – get Tier 1 (lvl 3) Wraith Walk (
lvls 6, 7 – get lvls 3,4 Localized Storm
lvls 8, 9 – Save the points
lvl 10 – get lvl 1 Dread Banner & lvl 1 Plunderbuss, remove the point from FIRE! and then put 3 points into Tingling Sensation so you can shock even when your gear doesn’t have chance to shock
lvls 11, 12 – get Localized Storm lvls 5, 6
lvls 13, 14 – save the points
lvl 15 – get Tingling Sensation to lvl 5, Powder Keg lvl 1, and Plunderbuss lvl 2
lvls 16 – get Plunderbuss lvl 3
lvls 17, 18, 19 – get Localized Storm lvls 7, 8, 9
lvl 20 – get Localized Storm lvl 10 + lvl 1 Broadside
lvl 21 – get Black Spot lvl 1
lvls 22 to 29 – get Powder Keg to lvl 10
lvls 30 to 36 – get Plunderbuss to lvl 10
lvls 37 to 44 – get Broadside to lvl 10
lvls 45 to 49 – get Double Cross to lvl 6
lvls 50 and up – At this point work towards filling the blanks such as Tier 3 Dread Banner and then Tier 2 Wraith Walk. Eventually, also getting Tier 2 Black Spot and reworking the skill points when you have the extra skill points from the Commodore’s Set items. Eventually, with enough chance to shock from items you can lower Tingling Sensation to just lvl 1.