

Bloody Slams
This build is a complete lvl 60 setup and is UP-TO-DATE with the new relic subclass rework. The subclass used is Blood Drinker. I consider the build as not underpowered but also NOT META. It can dish out serious damage when we are buffed up & our energy is full. A great source of damage is the combination of Blasting Charge to apply vulnerability + the Tier 2 Lantern Flash passive to get a total of +95% dmg (30% vulnerability + 65% dmg vs Slowed) vs enemies that are vulnerable and slowed at the same time. To make things better we get another +25% Damage Buff and pretty decent DPS from Blood Seekers. Spike Drive + Pound can be used to do nice damage and Hammer Spin can refill Pound and Blasting Charge‘s charges. Adding to this the dps of Blood Seekers + the DPS of Dance of Blades + Drain‘s DPS and the damage piles up. Blood Seekers, Living Barrier and Drain can heals us as well so the survivability of Blood Drinker builds can be pretty good. Living Barrier also gives us a +50% dmg reduction buff that can help us stay capped at 90% when we combine it with Fighter’s Spirit (+50% dmg reduction after using a melee skill/attack). Hammer Spin is also our escape mechanic and mobility skill and can hit enemies to proc Fighter’s Spirit + it gives us (at Tier 3) a +50% dmg reduction buff for 6sec. Skittering Shoulders (even without a set bonus) is a great source of survivability so it could be used instead of the Arc-Powered shoulders if you would rater get more dmg reduction and you’re not wearing the Cosmic Shoulders either.
Keep in mind that every relic had an amazing passive that gave it +5% of the corresponding elemental damage per level (total of 25%). This passive was AMAZING but the +25% dmg has now been removed. The silver lining here is that every build looses DPS, but we no longer need to use flat dmg affixes matching the relic element so it’s a bit easier to gear up builds now.
Build Video footage:
The skills I use:
- Pound – a good source of damage + the Tier 1 bonus gives it stun chance which helps with getting the bonus dmg from Lantern Flash Tier 2. Pound Tier 2 gives all our Slammer skills +20% dmg as well.
- Spike Drive – good damage + applies a 6 sec. slow so you can do even more damage
- Lantern Flash – burns + blinds for 1 sec so you can do more dmg + has an amazing Tier 2 passive bonus
- Hammer Spin – our escape mechanic and a movement skill. We also get 50% movement speed on Tier 1 for 6 sec. & on Tier 3 we get 50% dmg reduction buff for 6 sec after using it
- Blasting Charge – applies Vulnerability to the enemies to make them take more damage. Also does okay damage, especially when you have a Blast Breaker in the Legendarium so it won’t use up your endurance. The Tier 2 gives us 20% dmg reduction in melee.
- Drain – amazing DPS + Healing
- Living Barrier – it’s amazing and gives +50% dmg reduction and +20% max HP heal per second. It lasts for 3 seconds by default. This one’s on a cooldown and does not cost Energy.
- Blood Seekers – It’s a great bit of Extra DPS to nearby enemies as well as a +25% dmg buff + heals us every second.
- Dance of Death – Our BIG relic skill that we can active after spending a total of 200 energy with other skills like Drain. It’s good to save and use this on champions & bosses.
The gear I recommend using is:
MY IDEAL EQUIPPED GEAR:
- A well rolled socketed blue 2-handed weapon.
- OR a 1-handed setup with good rolled + socketed 1 handed Blue weapon + a good rolled & socketed blue Shield or Focus. (You could wear Blast Breaker if no better DPS Blue 1handed is available)
- Must wear at least 3 Cosmic pieces! I suggest wearing:
Cosmic Helm + Gauntlets + (Boots or Shoulders) + optionally wear the Breastplate [if not slotting it in the Legendarium]:- Cosmic Helm – gives +1 Conductor Skills (+2 with the 3 piece set bonus) [I’ve tested it and it won’t give you extra levels if the skill is already lvl 10 so go for lvl 9 if you have +1 or 8 if you have +2 to those skills]
- Cosmic Gloves – Use any Train Car active skill: next melee attack within 5 sec. causes a Flame Burst, dealing 80% Weapon Damage (Flame Burst is caused on an additional attack)
- Cosmic Boots – Hit with Basic Attack: gain a Seismic Charge. If already at 10 charges, consume them to send a shockwave, dealing 400% Weapon Damage (gains two charges pet hit with the 3 piece set bonus)
- Cosmic Pauldrons – when you cast Dance of Death (default relic skill): spawns an Enchanted Railhammer (a floating railhammer that follows you around and attacks enemies)
- Cosmic Chest – gives +1 Slammer Skills (+2 with the 3 piece set bonus) [I’ve tested it and it won’t give you extra levels if the skill is already lvl 10 so go for lvl 9 if you have +1 or 8 if you have +2 to those skills]
- Arc-Powered Shoulders (a great choice when not using the Cosmic ones) – Cast Dance of Death: become Charged Up for 15 sec., gaining 30% Movement Speed and dealing 100% Weapon Damage to nearby enemies on hit
If you ‘slot in’ the Cosmic Breastplate, you can get a good stat boost from a well-rolled + socketed Blue Chest.
You’ll be looking for flat dmg, optionally % elemental dmg and/or Crit dmg/chance, +%Evasion +%Block Chance & or +% Spike Drive DMG, +% Pound DMG, +% Slammer DMG + others.
- Blue Legs and Chest rolled for flat dmg + % elemental dmg or Crit dmg with a socket
- Optionally: Blue Boots rolled for % dmg (if stacking the same element across your gear) and/or Crit dmg with socket.
Blue Gear only gets 1 socket now.
Suggested Legendarium Powers (to fill in the gaps from items you’re wearing):
MY IDEAL LEGENDARIUM COMBO:
- Cosmic Breastplate (Chest)
- Arc-Powered Pants – 10% chance when using Drain to gain 25 Energy (20% chance with a set bonus, which it don’t recommend going for)
- Berserk Crusher – Spike Drive & Pound gain an additional Charge
Based on your preference there are alternatives:
- Option 1: Blast Breaker
- Option 2: Centrifugal Demolisher
- Option 3: Battery Ram – Cast any Cooldown skill: gain a Shock Charge (stacks up to 3 times) Cast Pound: spend a Shock Charge to create an electrical shockwave, dealing Pound‘s Weapon Damage
Or anything else you like (i.e. Skittering Shoulders if you need survivability)
The recommended stats to look for in your items are (the list is not in order of priority and is just listing good bonuses + there’s new stats and I might have missed some which will get added later):
- + Flat Damage (any)
- +% elemental dmg (any) – starts getting very good later on when you have a nice flat to boost with this if you match the flat with the %
- +% Damage to Slammer skills
- +% Damage to Spike Drive and/or Pound
- +% Damage to Drain, Blood Seekers, Dance of Death (I’d focus on either Drain or Blood Seekers if going for relic dmg stacking)
- + Health
- + Defense (the non elemental is good for any act but lesser numbers than elemental)
- +% Critical Hit Chance (the cap is 40% but some skills will be able to get it past the cap)
- +% Critical Damage (the cap is 300%)
- +% Gear Luck (eventually try to get like 50-75% total for good drop quantity – the cap is 100%)
- +% Energy Recharge Rate
- -% Relic Energy cost
- +% Block Chance (capped at 40%)
- +% Chance to Evade damage (capped at 40%)
- +% Endurance Regen
- +% Chance to Chill – a decent CC proc
- +% Chance to Poison is a decent DoT and stacks with other DoTs
- +% Chance to Bleed and/or Burn to stack the poison with the other DoTs.
- +% Chance to Stun/Slow/Blind – amazing and important choice! I suggest to get this as chance to Slow on Shield/Focus if using 1 Handed or on your weapon if using 2 handed in order to get the +65% dmg vs slowed bonus more often. Keep in mind we’ve got Pound to Stun, Spike Drive to Slow, and Lantern Flash to blind as well.
- +% Chance to Shock – a decent proc but not really needed for this build
- +% Additional Bolts Fired on Shock – a decent proc but not really needed for this build
The Skills and Passives I recommend are:
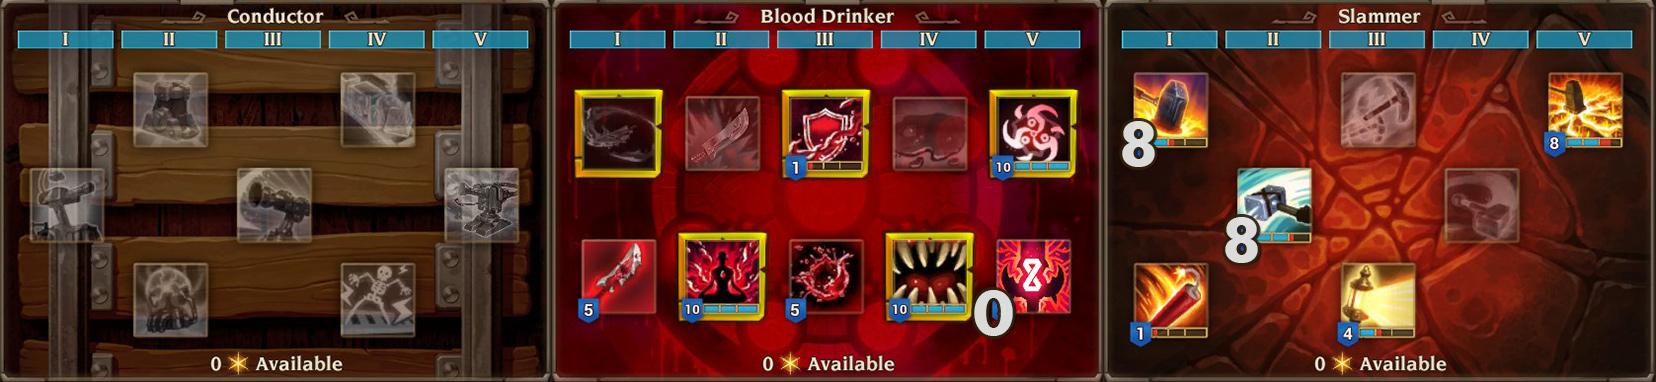
IMPORTANT: Keep in mind that my setup is WITH the +2 Conductor & +2 Slammer skill levels from the Cosmic Set Helm + Breastplate (Chest)! On top of that I did had an extra +1 Skill Point from my Helmet to a skill that I invested more than a single point into. This skill point has been excluded from the screenshots you’ll see.
REGULAR VERSION (Complete version of the one used in the video):

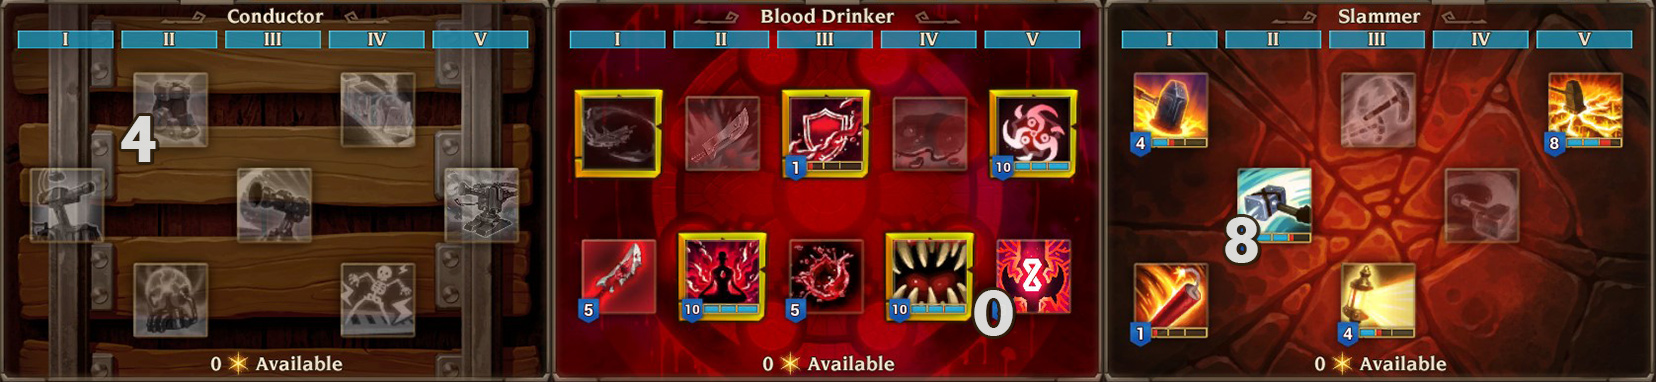
NO ENERGIZE BUT MAXING POUND:
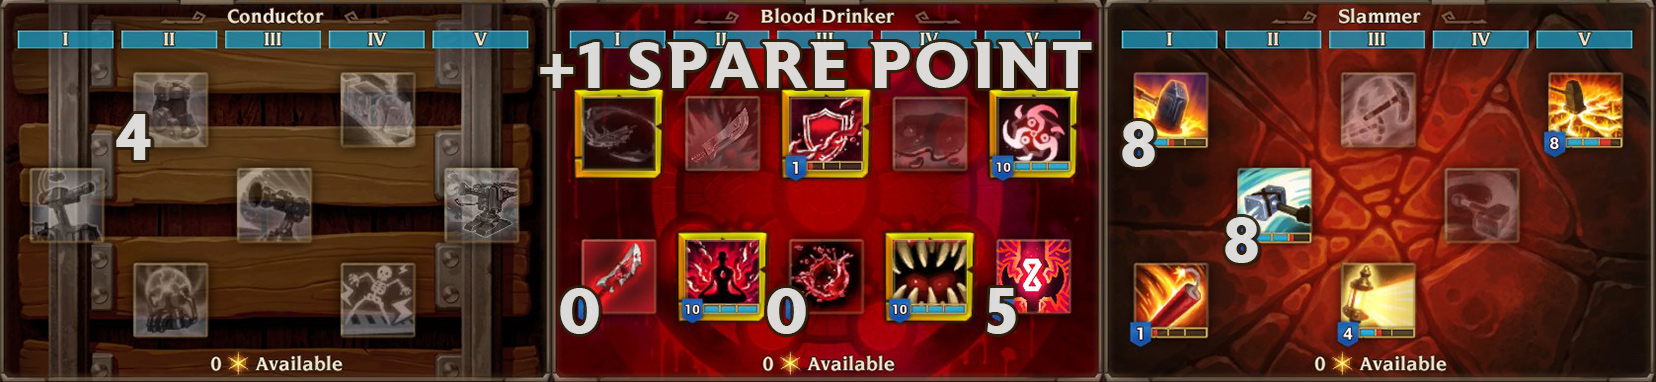
NO ENERGIZE BUT +10% RAILMASTER COOLDOWN:
NO RUPTURE & BLOODLETTER, MAX POUND & ENERGIZE + 10% RAILMASTER COOLDOWNS:
NO RUPTURE & BLOODLETTER, MAX POUND & ENERGIZE + 10% MORE ENERGY REGEN:

NO RUPTURE & BLOODLETTER, MAX POUND, 2 ENERGIZE + ENDURANCE REGEN + 10% SLAMMER CRIT CHANCE:
